Starting Dbus user session as SystemD service and export session address

While working on the LoRaWAN gateway project I came to requirement where I needed to start dbus user session so that various system services could talk to each other over the dbus. I could use system wide dbus session but I decided to use user session to make debugging easier.

The dbus user session will be started as a SystemD service before other services that use dbus. To start a user session dbus-launch command is used and it is writing process id and session address to the output as key/value pairs. Format of the output is:

DBUS_SESSION_BUS_ADDRESS=unix:abstract=/tmp/dbus-teW5DiLRE0,guid=0a67ec3093886a111bc509a65cc45278
DBUS_SESSION_BUS_PID=295

More details here: https://dbus.freedesktop.org/doc/dbus-launch.1.html

Example Shell script to start dbus user session

#!/bin/sh

echo "Starting Dbus user session"

GATEWAY_RUN_DIR="/var/run/gateway"
GATEWAY_DBUS_SESSION_FILE="$GATEWAY_RUN_DIR/gateway-dbus-session"
GATEWAY_DBUS_PID_FILE="$GATEWAY_RUN_DIR/gateway-dbus-session.pid"

# If doesesnt exist create a directory for the gateway files
mkdir -p "$GATEWAY_RUN_DIR"

dbus-launch --sh-syntax > "$GATEWAY_DBUS_SESSION_FILE"

# dbus-launch outputs key value pairs, so it can be sourced to read back variables to obtain process pid
# Example output from the dbus-launch:
# DBUS_SESSION_BUS_ADDRESS=unix:abstract=/tmp/dbus-teW5DiLRE0,guid=0a67ec3093886a111bc509a65cc45278
# DBUS_SESSION_BUS_PID=295

source "$GATEWAY_DBUS_SESSION_FILE"

echo "Dbus session started:"
echo -e "\tSession file: $GATEWAY_DBUS_SESSION_FILE"
echo -e "\tPID file: $GATEWAY_DBUS_PID_FILE"
echo -e "\tDbus session socket: $DBUS_SESSION_BUS_ADDRESS"
echo -e "\tProcess PID: $DBUS_SESSION_BUS_PID"

# Write PID to pid file
echo "$DBUS_SESSION_BUS_PID" > "$GATEWAY_DBUS_PID_FILE"

Starting Dbus user session as SystemD service

[Unit]
Description=Dbus User Session Service
After=dbus.service

[Service]
Type=forking
PIDFile=/var/run/gateway/gateway-dbus-session.pid
ExecStart=/usr/bin/gw-dbus-user-session.sh

[Install]
WantedBy=multi-user.target

PID file permision problems on SystemD 237

When trying to pass a PID file to the SystemD it will complain about user permissions on the PID file.

Apr 27 14:09:22 imx6ul-var-dart systemd[1]: gw-dbus-user-session.service: Permission denied while opening PID file or unsafe symlink chain: /var/run/gateway/gateway-dbus-session.pid

This seems to be because of the stricter rules of the ownership in the /run folder when SystemD version 237 is used.

Discussion and patch for this problem can be found here:

Issue: http:// https://github.com/systemd/systemd/issues/8085

Patch: https://github.com/Werkov/systemd/commit/811cc88c10cfe23b6f98d7f0b8332003da38412b

Yocto recipe for the SystemD user session daemon

SUMMARY = "Gateway DBus user session daemon"
DESCRIPTION = "Recipe for the dbus user session daemon"
LICENSE = "MIT"
LIC_FILES_CHKSUM = "file://${COMMON_LICENSE_DIR}/MIT;md5=0835ade698e0bcf8506ecda2f7b4f302"

inherit systemd

SRC_URI = "file://."
S = "${WORKDIR}"

RDEPENDS_${PN} += "bash"

FILES_${PN} += "	${bindir}/gw-dbus-user-session.sh  \
			${systemd_unitdir}/system/gw-dbus-user-session.service	\
"

SYSTEMD_SERVICE_${PN} = "gw-dbus-user-session.service"

do_install() {
	install -d ${D}${bindir}
	install -m 755 ${S}/gw-dbus-user-session.sh ${D}${bindir}

	install -d ${D}${systemd_unitdir}/system
	install -m 755 ${S}/gw-dbus-user-session.service ${D}${systemd_unitdir}/system
}
Snake game Update #2

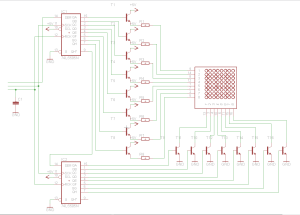
In a previous post I shared a schematic how to wire two 74HC595N shift registers, PNP transistors and 8×8 LED matrix, but I did not thought everything carefully enough and did not put a resistor in between second shift register and transistor, so I manage to “burn” shift register that controls row of cathodes on matrix. Thankfully they are not so expensive and I have ordered new one on eBay.

New design after improvements should look like this:

Led matrix 8x8 74hc595n pnp transistor

…………………………………………………..

Also, I did some work on Matrix class and Snake game by itself. Game code if far from complete and what I expect to see, but some functionality is working.

In matrix class only thing I changed is that now I turn off all leds at the end of cycle, otherwise last row stays longer on that others and look little bit brighter. Otherwise no changes.

void MatrixClass::display()
{
  for (int i = 0; i < 8; i++)
  {
    byte row = B00000001 << (7 - i);
    byte col = B00000000;

    for (int j = 0; j < 8; j++)
    {
      if (leds[i][j] == 1)
      {
        col |= B00000001 << (7 - j);
      }
    }

    digitalWrite(latchPin, LOW);
    shiftOut(dataPin, clockPin, LSBFIRST, col);
    shiftOut(dataPin, clockPin, LSBFIRST, row);
    digitalWrite(latchPin, HIGH);

    delay(2);
  }

  digitalWrite(latchPin, LOW);
  shiftOut(dataPin, clockPin, LSBFIRST, B00000000);
  shiftOut(dataPin, clockPin, LSBFIRST, B00000000);
  digitalWrite(latchPin, HIGH);
}

And first tests to see how Matrix is working.

#include "Matrix.h"

enum Direction
{
  UP, RIGHT, DOWN, LEFT
};

struct Position
{
  int x;
  int y;
};

// Matrix pins
int DATA_PIN = 2;
int CLOCK_PIN = 3;
int LATCH_PIN = 4;
MatrixClass matrix;

// Joystick pins
// A1 - X axis
// A0 - Y axis

int deadZone = 32;

// Snake
int size;
Direction direction;
Position snake[64];

int frameLenght = 1000;
int frameTime = 0;
long lastUpdate = 0;

bool gameOver;

void setup()
{
  // Initialize led matrix
  matrix.init(DATA_PIN, CLOCK_PIN, LATCH_PIN);

  // Setup input
  pinMode(A0, INPUT);
  pinMode(A1, INPUT);

  restartGame();

  lastUpdate = millis();
}

void loop()
{
  // Update input
  getInput();

  /* Update game
  I do update only every second
  */
  frameTime = frameTime + millis() - lastUpdate;
  lastUpdate = millis();
  if (frameTime > frameLenght)
  {
    // Update game
    updateSnake();
    frameTime = frameTime - frameLenght;
  }

  // Draw game
  matrix.clear();
  drawSnake();
  matrix.display();
}

void restartGame()
{
  direction = RIGHT;
  size = 3;
  snake[0].x = 4;
  snake[0].y = 4;
  snake[1].x = 3;
  snake[1].y = 4;
  snake[2].x = 2;
  snake[2].y = 4;
  gameOver = false;
}

void getInput()
{
  int x = analogRead(A1);
  int y = analogRead(A0);

  if (x < (512 - deadZone))
  {
    direction = RIGHT;
  }
  else if (x > 512 + deadZone)
  {
    direction = LEFT;
  }
  else if (y < 512 - deadZone)
  {
    direction = UP;
  }
  else if (y > 512 + deadZone)
  {
    direction = DOWN;
  }
}

void updateSnake()
{
  // Move all joints up by one pisition in array
  for (int i = size - 1; i > 0; i--)
  {
    snake[i] = snake[i - 1];
  }

  // Set a heads position depending on which side snake is facing
  if (direction == RIGHT)
  {
    snake[0].x = snake[1].x + 1;
    snake[0].y = snake[1].y;
  }
  else if (direction == DOWN)
  {
    snake[0].x = snake[1].x;
    snake[0].y = snake[1].y + 1;
  }
  else if (direction == LEFT)
  {
    snake[0].x = snake[1].x - 1;
   snake[0].y = snake[1].y;
  }
  else if (direction == UP)
  {
    snake[0].x = snake[1].x;
    snake[0].y = snake[1].y - 1;
   }
}

void drawSnake()
{
  for (int i = 0; i < size; i++)
  {
    matrix.setHigh(snake[i].y, snake[i].x);
  }
}

And of course final result

Snake game Update #1

Yesterday got a new Arduino Mega 2560 board in my hands, so decided to make something interesting. I do not have a lot of components, but I have 8×8 LED matrix and a couple of 74HC595 shift registers, so my plan is to make a Snake game. After a little bit reading about Arduino and how the shift registers work I came up with design how to wire an LED matrix.

matrix

I was unable to find a specification for this led matrix, so the only way to figure out which pins are anodes and which are cathodes I had to use a multimeter and test them all. …. I have played a little bit with code I wrote a class to control a led matrix. I don’t know is it a good design, but it works for me and I can change it in future.

Matrix class


class MatrixClass
{
  private:
    bool leds[8][8];

    int dataPin;
    int clockPin;
    int latchPin;

  public:
    void init(int data, int clock, int latch);
    void clear();
    void setHigh(int row, int col);
    void display();
};

void MatrixClass::init(int data, int clock, int latch)
{
  dataPin = data;
  clockPin = clock;
  latchPin = latch;

  pinMode(data, OUTPUT);
  pinMode(clock, OUTPUT);
  pinMode(latch, OUTPUT);
}

void MatrixClass::clear()
{
  for (int i = 0; i < 8; i++)
  {
    for (int j = 0; j < 8; j++)
    {
      leds[i][j] = 0;
    }
  }
}

void MatrixClass::setHigh(int row, int col)
{
  leds[row - 1][col - 1] = 1;
}

void MatrixClass::display()
{
  for (int i = 0; i < 8; i++)
  {
    byte row = B00000001 << (7 - i);
    byte col = B00000000;

    for (int j = 0; j < 8; j++)
    {
      if (leds[i][j] == 1)
      {
        col |= B00000001 << (7 - j);
      }
   }

   digitalWrite(latchPin, LOW);
   shiftOut(dataPin, clockPin, LSBFIRST, col);
   shiftOut(dataPin, clockPin, LSBFIRST, row);
   digitalWrite(latchPin, HIGH);
  }
}

Pāreja uz MonoGame

Pirms pāris nedēļām iegādājos jauno Windows 8.1. Viss strādā lieliski, bet ir arī daži pārsteigumi, kā piemēram ierobežojumi veidot XNA spēles priekš Windows 8 un Windows Phone 8. Itkā ir iespējams turpināt rakstīt parastas Windows aplikācijas, bet nevar izmanot WP8 un W8 specifiskas fīčas. Tapēc nolēmu migrēt uz MonoGame. Nekādas lielas atšķirības nemanu, bij problēmas ar Visual Studio + MonoGame templates, bet kombinācijā VS2012 Pro un MonoGame 3 viss strādā. Nopirku arī Nokia Lumia 925, tapēc centīšos veidot spēli tā, lai varētu palaist arī uz telefona.

Tālu neesu ticis, uz doto mirkli izskatās šādi:

Main Menu

Šodien mazliet padarbojos pie galvenās izvēlnes. Mākslinieks no manis nekāds, bet iesākumam būs labi. Arī rakstnieks no manis tikpat liels cik mākslinieks, tapēc saprātīgāk būs vienkārši atrādīt progresu, pieminot problēmas un izceļot interesantākas vietas.

Pievienoju InputManager, Button klasi un veicu dazas izmainas MainMenuScreen, visu var lieliski rezēt uz BitBucket, tapēc neredzu jēgu te postot kodu.

Screen menedžers

Nolēmu jau pašā sākumā izveidot ļoti vienkaršu Screen(State) menedžeri.

Kas ir screen vai state menedžers?

Spēle var būt dažādos “stāvokļos”, piemeram MENU, PLAY, PAUSE utt. Katram no šiem stāvokļiem būs atbilstoša klase, Screen menedžers koordinēs pārslēgšanos no viena Screen uz nakamo. No sākuma es izveidošu ļoti elementāru medžedzeri bez pārslēgšanās efektiem, loading screeniem utt.

Tātad pievienoju projektam mapi SCREENS, ScreenManager klasi, abstraktu klasi Screen un iesākumam divas konkrētas klases MenuScreen un PlayScreen, kuras izriet no Screen. ScreenMenedzer izriet no DrawableGameComponent un tiek pievienots compontntiem Game klases konstruktorā.

ScreenManager screenManager = new ScreenManager(this);
screenManager.SetScreen(new MainMenuScreen(screenManager));
Components.Add(screenManager);


public class ScreenManager : DrawableGameComponent
{
#region FIELDS
private Stack<Screen> screens;
private Screen screenToUpdate;

private SpriteBatch spriteBatch;
#endregion

#region CONSTRUCTORS
public ScreenManager(Game game)
: base(game)
{
screens = new Stack<Screen>();
screenToUpdate = null;
}
#endregion

#region SCREEN MANAGER INTERFACE
public void SetScreen(Screen screen)
{
foreach (Screen scr in screens)
{
scr.UnloadContent();
}
screens.Clear();

screen.LoadContent();
screens.Push(screen);
}
#endregion

#region GAME INTERFACE
protected override void LoadContent()
{
spriteBatch = new SpriteBatch(GraphicsDevice);
}

public override void Update(GameTime gameTime)
{
if (screens.Count > 0)
{
screenToUpdate = screens.Peek();
screenToUpdate.Update(gameTime);
}
}

public override void Draw(GameTime gameTime)
{
if (screens.Count > 0)
{
foreach (Screen screen in screens)
{
screen.Draw(spriteBatch);
}
}
}

protected override void UnloadContent()
{
foreach (Screen scr in screens)
{
scr.UnloadContent();
}
base.UnloadContent();
}
}

public class Screen
{
#region FIELDS
private ScreenManager screenManager;
#endregion

#region PROPERTIES
public Screen(ScreenManager screenManager)
{
this.screenManager = screenManager;
}
#endregion

#region CONSTRUCTORS
public ScreenManager ScreenManager
{
get { return screenManager; }
}
#endregion

#region PUBLIC METHODS
public virtual void LoadContent()
{

}

public virtual void Update(GameTime gameTime)
{

}

public virtual void Draw(SpriteBatch spriteBatch)
{

}

public virtual void UnloadContent()
{

}
#endregion
}
class MainMenuScreen : Screen
{
#region TMP
private int testFrames = 0;
#endregion

#region CONSTRUCTORS
public MainMenuScreen(ScreenManager screenManager)
: base(screenManager)
{

}
#endregion

#region GAME INTERFACE
public override void LoadContent()
{
Console.WriteLine("MenuScreen LoadContent()");
}

public override void Update(GameTime gameTime)
{
Console.WriteLine("MenuScreen update()");

#region TMP
if (testFrames > 10)
{
ScreenManager.SetScreen(new PlayScreen(ScreenManager));
}

testFrames++;
#endregion
}

public override void Draw(SpriteBatch spriteBatch)
{
Console.WriteLine("MenuScreen draw()");
}

public override void UnloadContent()
{
Console.WriteLine("MenuScreen UnloadContent()");
}
}
#endregion

Asteroīdi 101

Iespaidojoties no foruma biedra Vilx (boot.lv), nolemu pielikt arī savu roku pamācību rakstīšanā. Mana pieeja gan būs mazliet savādāka, es mēģināšu izveidot ļoti vienkāršu spēli, programēšanas pamatus atstājot kāda cita ziņā. Tā kā Vilx deva priekšroku C#, tad es arī turpināšu izmantot šo pašu valodu un vidi. Brīdinu uzreiz ka manas C Sharp zinašanas nav tās spožākās, bet mēģināšu mācīties pats un pie reizes informēt citus, kā man sokas. Pieļauju domu ka mani raksti nebūs regulāri un var gadīties lielāki pārtraukumi starp tiem, kā arī jebkurā mirklī tie var apstāties pilnībā, jo esu samērā aizņemts darbā un koledžā. Mans programēšanas stils nav perfekts un risinājumi, kurus pielietošu, ne tuvu tie pareizakie, tomēr ceru uz kritiku komentāros, lai varētu mācīties gan pats, gan citi.
Pilnibā sākt visu no nulles nav vajadzības, tapēc izmantošu Microsoft populāro un samērā labi izstrādāto dzinēju – XNA. Microsoft pats ir pārstājis XNA attīstīšanu, bet ir pieejama alternatīva – MonoGame, kas būtiba ir kopēts XNA un pa lielam nav nozīmes kuru no viņiem izmantot.
Labākais ko manuprāt būtu darīt ir ķerties uzreiz vērsim pie ragiem. Pirmā lieta ko vajadzētu izdarīt ir lejupielādēt un uzinstalēt Visual Studio. Es izmantoju VS 2012 Desktop Edition, man kā studentam viņa ir pieejama par brīvu. Tiem kuriem nav pieejama 2012 versija, iesaku izmantot VS 2010 Express, jo ta ir bezmaksas un ari XNA vieglak uzstādāms. Protams vajadzētu lejupielādēt un uzstādīt pašu XNA. Instrukcijas un visu pārējo var atrast šeit http://www.microsoft.com/en-gb/download/details.aspx?id=23714
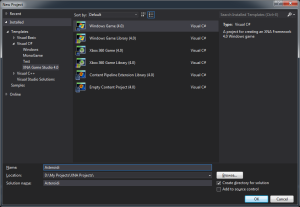
Kad tas ir izdarīts, var startēt Visual Studio un izveidot jaunu projektu. Izvelamies File->New Project un no pieejamajiem šabloniem Windows Game 4.0, projekta nosaukumam uz doto mirkli nav nozīmes, bet es ieteiktu izvēlēties kautko saprātīgu, piemēram manā gadījumā – Asteroidi. Kapēc Asteroidi? Tāpēc ka pirma spēle, kuru mēģināšu izveidot būs līdzīga klasiskai spēlei Asteroids.
lwsson_101_01
Kad viss gatavs, spiežam OK.
Kad viss veiksmīgi izdarīts, VS uzģenerēs standarta projektu. Pirmā lieta, ko ievēro ir Game1 klase. Tā kā man nepatīk tāds jokains nosaukums, tad es Solution Explorerī pārsaucu viņu vienkarši par Game. VS nomainis gan faila, gan klases nosaukumu.
Tik tālu visam vajadzētu būt skaidram. Turpmāk soli pa solim virzīšos uz priekšu, pieminot katru klasi un katru metodi, kuru pievienoju. Cerams kādam būs noderīgi.
Priekš pirmā raksta vajadzētu būt pietiekami. Spiežam Run vai F5 un skatamies kas notiek.
Veiksmi!